A DIY Stair Makeover: Tutorial And Tips
Update the look of your stairs! This DIY tutorial will show you how we completely transformed our stairway with an inexpensive stair makeover.
When we first bought our house, we knew we had a lot of updating to do. But we were excited for the challenge! It’s been so rewarding to see each area transform and we’ve been learning a lot along the way.
This little bit of stairs is the first thing you see when you enter our house. We’ve been slowly replacing the doors and trim throughout our house and wanted to update this area to match the new style.
Disclaimer: We are no experts. Between trial and error (and LOTS of YouTube), we’re having fun and learning as we go.
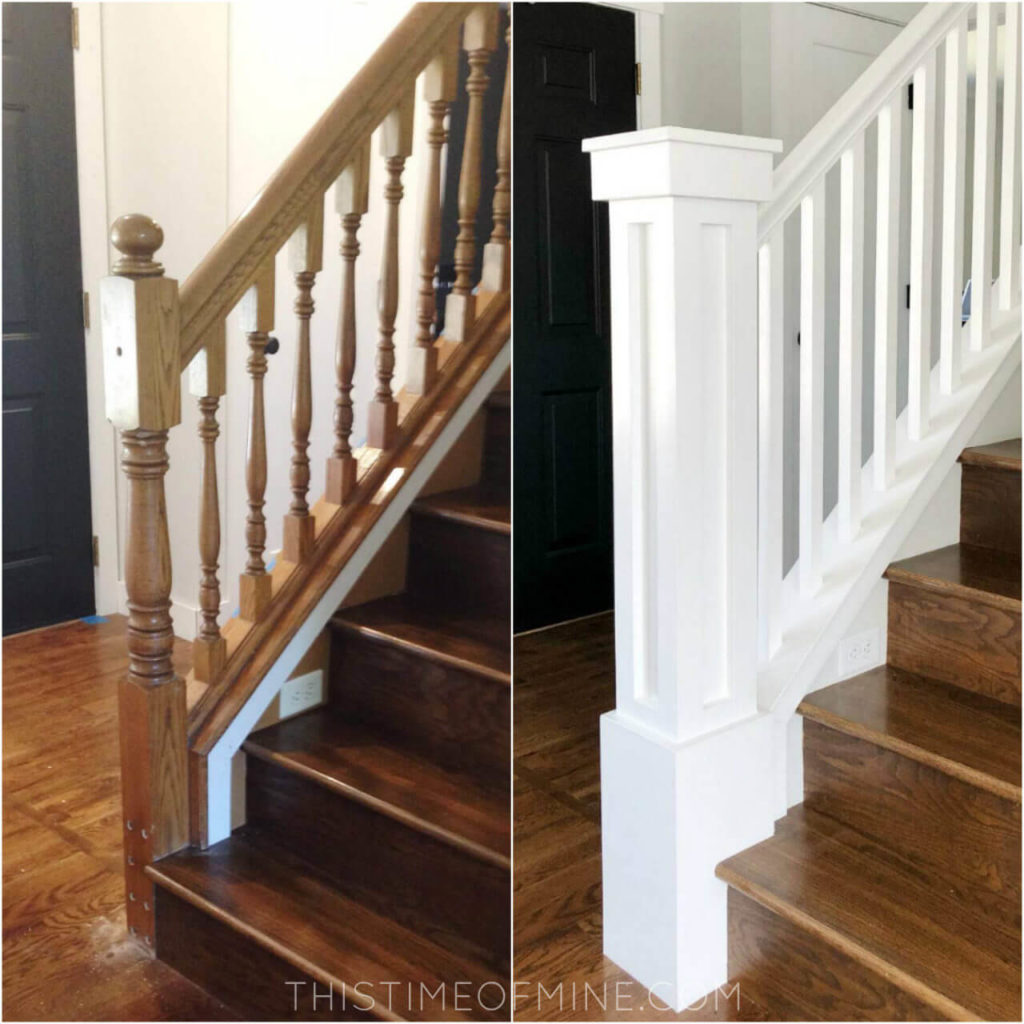
Here’s what the area looked like before. (Excuse the dust and painting tape. We were just getting started when I snapped this picture.)
![]()
Oh, and the brown paint you see is from the previous owners. That used to be the color of the entire front room…including the front door. Trust me when I say it was overkill.
OUR STAIR MAKEOVER
This post contains affiliate links. For more information, see my disclosures here.
First, we removed the newel post, handrail and balusters.
![]()
![]()
Newel Post
Next up was finding a more modern newel post. We were originally going to purchase one, but after looking at prices, we quickly changed our minds.
Instead, we found scrap pieces of MDF leftover from other projects and came up with our own design.
We started building around the existing post so we didn’t have to buy anything.
![]()
We secured it with the original screws before putting the front piece on. Then we continued building out from there.
![]()
When we first came up with the design, I didn’t realize how many layers it would take! This thing weighs a ton I’m sure.
To finish, we decided to keep it flat on top. That square was the last piece we added.
![]()
Railing
We picked up a new handrail so I didn’t have to deal with deglossing and sanding the finish off of the old oak one. This project would have cost even less if I’d used the existing handrail, but I knew I’d be painting it white, so we forked over the $80.
Then we put a piece of MDF along the bottom, just above the trim. And before securing the handrail, we put another piece of MDF along the wall.
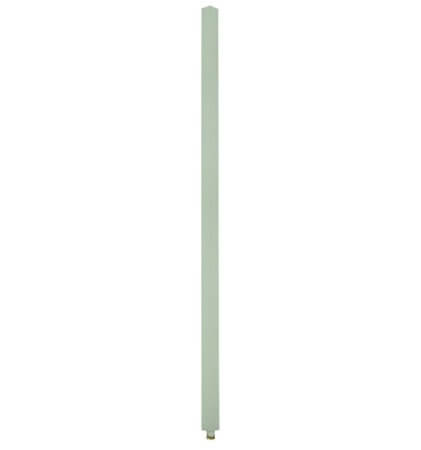
We picked up these square balusters at Home Depot for around $5 each. They’re 1 1/4 inches wide.
The general rule of thumb is to keep balusters less than 4 inches apart. So the first step was to figure out our spacing. And since I don’t like complicated math problems, I got real “technical” and cut up a bunch of 1 1/4 inch pieces of painter’s tape.
We spaced them out on the bottom piece of MDF until we got it right. Then we marked it all out in pencil. Our spacing came out to around 3 3/4 inches.
Then it was time to put in the balusters! We started at the newel post and worked our way up from there.
![]()
The process was pretty simple, but it took a lot of very careful measuring.
An important tip when redoing stairs is to cut everything one at a time, measuring as you go. So that’s what we did.
First, we measured a spacer (that came with the handrail) and cut it. The first and last spacers were slightly different, but the rest were all 3 3/4 inches.
Starting at the newel post, we nailed a spacer to the handrail.
Next, we measured a baluster and cut the bottom at an angle. Then we placed it against the spacer and used a leveler to make sure the baluster was straight.
Then we cut the top at an angle. (For each angle, we just marked with a pencil and started from there, adjusting as we needed.)
To secure the baluster, we nailed it to right into the bottom piece of MDF at an angle. (I didn’t want the look of having spacers on the bottom.)
Then we finished by nailing the top of the baluster to the handrail, also at an angle.
We repeated the process for all 12 balusters. First spacers, then balusters.
![]()
One thing we were worried about was having the balusters twist as we nailed them in. So again, being super “technical”, we clamped a scrap piece of wood to the wall so each baluster would be up against a straight edge.
![]()
We used a small piece and moved it as we went. When we used one long piece that covered the whole thing, it tended to move out of place easier.
RELATED: The Amazing Power Of Paint: A Complete Hallway Transformation
Here’s what it looked like when we finished.
![]()
Finishing up
Next came the tedious part…filling all the seams and nail holes with wood filler and then sanding it all.
Here it is in it’s “teenage” phase. My husband thinks it looks like teenage acne by this part of every project.
![]()
Using a cabinet foam roller and a small angled brush, I primed the whole thing before painting.
![]()
For the final coat, we used alkyd paint since it is such a high traffic area. We used Benjamin Moore Chantilly Lace.
We decided to keep everything white. I may possibly change the color of the handrail in the future, but I love it for now!

Wall color is Benjamin Moore Gray Owl, lightened by 50%.
![]()
And that’s it!
The whole stair makeover cost around $150 and took a few weeks. Projects take so long when you have little kids around. But the end result was worth it!
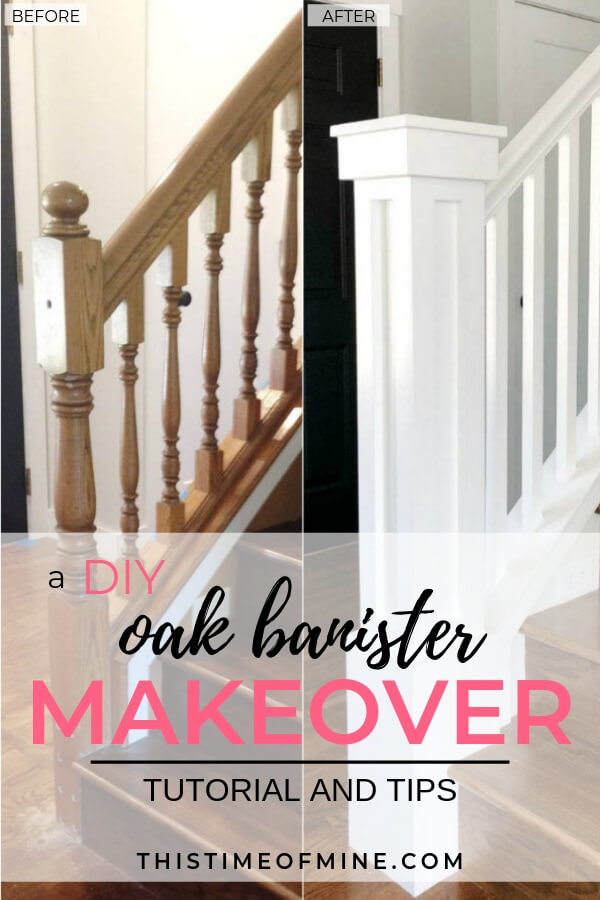
Our stairs now fit right in with the style and color of our newly remodeled living room. Goodbye spindly oak banister!
We waited to do the top part of the stairs until we did our hallway. We used the same handrail and balusters, but styled the newel post a little differently.
Here is one more before and after, side by side.
Have you ever attempted a stair makeover? I’d love to hear about it in the comments below!
want to remember this?
PIN IT TO YOUR FAVORITE BOARD
Share this article:
What are your plans for building out the Newell post? Thanks
Have new build and I have constructed stairs in situ. Your make over looks brilliant and I have taken some great tips from it. Very well explained and good photos. Hope mine turns out as good.
Thanks so much Paul! Best of luck on your new build!
So, fast forward, how has your white handrail held up? I’ve always read to go dark because they require such frequent cleaning. Opinion?
Is the rail attached to the Newell with countersunk screws? I would really like to take mine apart down to the bare bones and start over, much like you did because our puppy chewed some of the molding and spindles. This has been the only thing stopping me; I didn’t know how the rail was attached to the wall or newel.
Wow! What a transformation! Your entryway looks completely different now! I received a quote from a local refinisher for banister refinishing, but after seeing your process it seems like a doable DIY project!
Beautiful!!! I didn’t see a picture at the top of the rail to see how it connected to the wall. Can you take a picture? Or explain what you did? Did you use a decorative piece? Thank you
It looks so great!! Question: did you just add a small railing on the wall for the top of the stairs? I think that’s what I see from pictures. We are going to redo our railing and have a little bit of wall after the main big railing and the top of the stairs.
We did! We actually grabbed a black aluminum outdoor handrail because I liked the look and the standard size worked for our space. But a wooden handrail would allow for a shorter span.
Hello Jen
Your finished project looks really good! How wide and long were your balusters?
Vince Malgeri
Thanks Vince! Our handrail is about 36″ high, so we measured each baluster according to that. We measured each one at a time (height and angle) and the balusters have a spacing of around 3.5″. Hope that helps!
Thank you Jen it certainly helps; I have reviewed a lot of these stairway remodels now on YouTube etc. I think the design and appearance of your make-over is the very best by far, and if its alright I plan to try to duplicate your model closely. We have a relatively new stairway now that has received many compliments but my wife objects to the natural wood newels and the metal pipes that act as both the handrails and balusters. Vince
Thanks! And it’s totally ok, good luck!
Hi, Can I ask how you fixed your handrail to the newel post?
Hi Carolyn! Before adding the balusters, we predrilled at an upward angle. Then we used a countersink drill bit before adding the screw. This allowed the screw to go all the way in so it didn’t get in the way of the fillet (the spacer underneath).
Great job! I am in the process of tearing out a wall in our staircase and putting in a banister and spindles. I was having a little trouble figuring out how to finish the top of the wall and to “build” the banister at the bottom but your directions are great. I can’t wait to see mine finished! Thanks!!
Thank you! Getting that wall out and putting in a banister is going to look so good and totally open things up. Good luck!
Looks awesome I am planning to paint just the spindles white on brown crossing my fingers! Yours is beautiful
That’s going to look so good!
At the bottom of frame post, did you cut into last stair thread of just framed it with pieces of wood and wood filler? I want to frame my current post