The #1 Moving Tip That Will Save Your Sanity
Preparing for a move is stressful. But packing is just half the battle! Find out how to ease the stress of unpacking with this extremely helpful moving tip. And use these free moving labels to keep you organized during your next move!
Moving is pretty much the worst.
It’s when you realize how much stuff you actually have, how little sleep you can survive on and if you’re able to beat the moving truck in a ridiculous game of Tetris.
But there’s one thing worse than all of that:
Not being able to find anything once you move!
Endlessly digging through a mountain of boxes, with no energy (or scissors because…wait, what box did they end up in?) isn’t my idea of fun. So being the ridiculous organizer that I am, I adopted a method that made our last move 1000% times better than any of our previous moves.
In fact, it worked so well I wanted to share this moving tip with you!
There’s a lot of good advice out there. But this particular moving tip deals with how you organize your packing so that you can find everything you need when you arrive at your new place.
Now, if you’re not the organizing type, just trust me on this one. I know it might seem like an extra step you don’t have the patience for during a hectic move (all moves are hectic, right?). But you’ll be SO glad you took the time to do this. I promise!
Ok. We’re about to go label and inventory crazy. Ready?

STEP 1
First, get a notebook or notepad that won’t blend in or get lost in the mix of stuff. Mine was bright yellow and I NEVER let it out of my sight.
You’ll use this to inventory everything!
STEP 2
Next, you’ll need to choose a labeling system. This will determine the type of labels you’ll need.
Depending on the layout of your new place, you’ll use one of two systems. Use what works best for you:
System #1: Make each room a color group
If you aren’t dealing with multiple floors, make each room a separate color group.
System #2: Make each floor a color group.
Because we moved into a home with an upstairs and a basement, each floor got it’s own color. The garage/outside stuff also got it’s own color.
I still labeled each box with the room it belonged in, but I did that separately.
STEP 3
Now it’s time to prepare some labels in bright colors.
I had a bunch of neon note cards left over from who knows what. I cut them up, grabbed a permanent marker and got labeling! (Grouping things by color made things so much easier!)
You can definitely do that with colored paper too. It works great!
But moves are crazy. So if you’d like one less thing to think about during moving prep, let me help you out!
STEP 4
Before sealing each box, do these 3 things:
1. Add a location label to each box
- Put the floor label in the top left corner (if using System #2).
- Put the room label in the top right corner (or just write the name of the room straight on the box in permanent marker).
IMPORTANT!
Put all labels on the FACE of the box. Not on the top. This way, you can still see all labels when the boxes are stacked.
Bonus Tip: Put these labels on everything! Not just boxes. This will make your life easier when unloading the truck.
2. Fill out the room label
- What’s in this box?
- Don’t get crazy specific, save that for your notebook. Keep it general.
Bonus Tip: Name each box. This will help with inventory. (Example: Kitchen 1, Kitchen 2, Kitchen 3 or Craft Supplies 1, Craft Supplies 2, etc.)
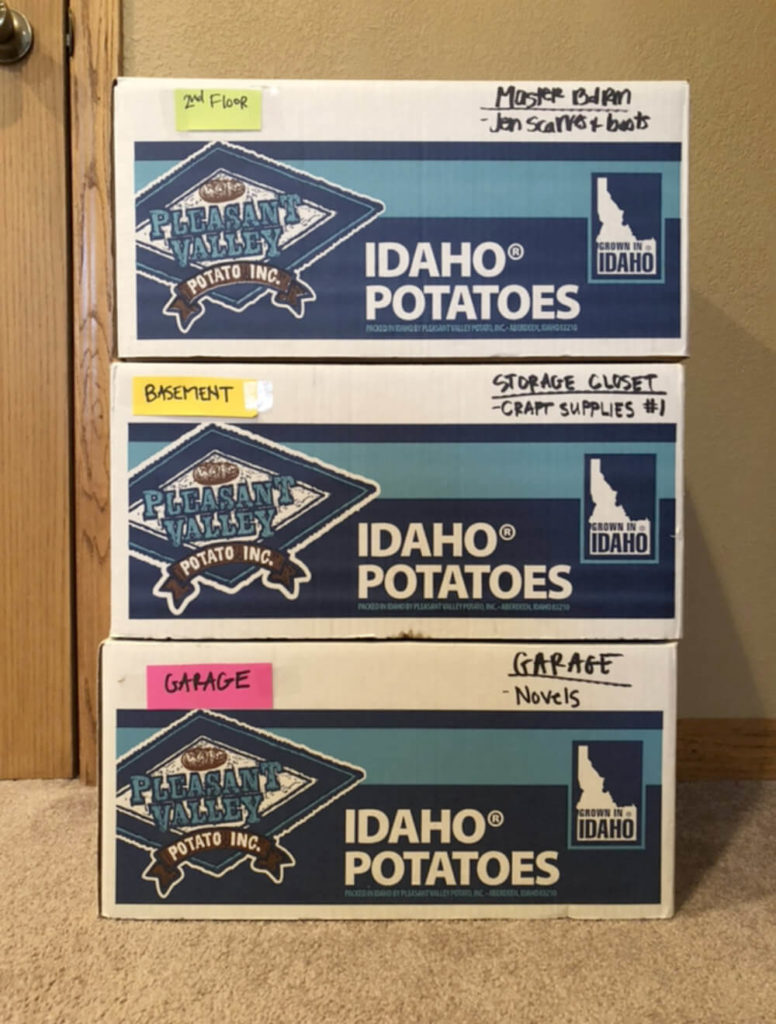
Side note: These potato boxes were the best thing ever. I wish they didn’t take up so much storage space so I could’ve kept them for any future moves!
3. Write it down in your notebook
Now it’s time to get specific. Here’s an example from my notebook.
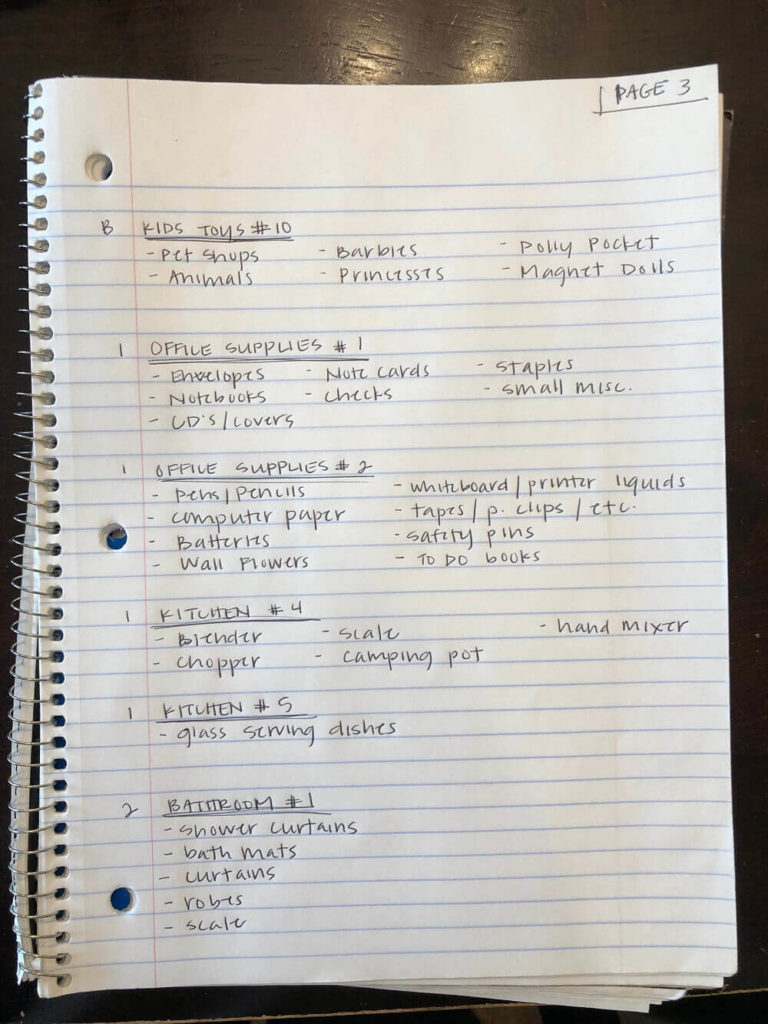
- In the left margin, I put the floor (B = basement | G = garage | 1 = 1st floor | 2 = 2nd floor)
- Then I put the name of each box along with everything that was in that box.
- There’s no rhyme or reason to the order of my boxes here. I just wrote them down in the order they were packed. That’s why I labeled them in the notebook as clearly as I could.
STEP 4
Rest.
Just kidding. That doesn’t happen until waaaaaay later. (Can you tell I love moving?)
Let’s just skip to Step 5.
STEP 5
When you finally get to your new place, it’s time to unload the truck!
Instead of designating 1 room for everything, take each item and box to it’s labeled location right away. The labels will make this easier, especially if you’re able to have people help. They’ll know exactly where to put each box (and everything else!) without having to ask you multiple times where you want it.
YOU DID IT!
Now that you’re in your new place, you have everything in its proper vicinity. This will make the unpacking process so much easier.
And since you probably won’t unpack everything right away, you’ll at least know exactly where everything is when you need it!
This moving tip was incredibly helpful to me and I hope it’ll help you too! Good luck on your future move!
What’s your favorite moving tip?
want to remember this?
PIN IT TO YOUR FAVORITE BOARD
Share this article: